Nestled in the heart of Florida, Blue Springs State Park awaits, enticing outdoor enthusiasts with its natural allure and hidden beauty. With its crystal-clear waters and abundant wildlife, this park provides a captivating escape from the hustle and bustle of daily life.
Whether you’re a nature lover, a thrill-seeker, or simply seeking tranquility, Blue Springs State Park has something for everyone. Strap on your snorkel and witness the mesmerizing underwater world, teeming with vibrant fish and mysterious aquatic plants. Or, embark on a hiking adventure through the lush forest trails, where you might catch a glimpse of the elusive Florida black bear or playful river otters.
Blue Springs State Park offers a unique opportunity to witness firsthand the magic of the natural world. Immerse yourself in the ethereal beauty of the springs, where the water shimmers in hues of blue, creating an idyllic backdrop for a serene picnic or a leisurely stroll.
Discover this hidden gem and indulge in a remarkable experience that will leave you with lasting memories. Blue Springs State Park beckons, ready to unveil its wonders to those who dare to explore.
Natural attractions and activities at Blue Springs State Park
Blue Springs State Park is a haven for nature lovers, offering a plethora of natural attractions and activities. The main highlight of the park is the Blue Spring, a stunning natural spring that flows with crystal-clear blue water. The spring maintains a constant temperature of 72 degrees Fahrenheit, making it an ideal spot for swimming, snorkeling, and scuba diving.
The underwater world of Blue Springs is a mesmerizing sight to behold. Strap on your snorkel and witness the vibrant fish darting through the water, their colors reflecting the sunlight that filters down from above. The aquatic plants sway gently in the current, creating a serene and otherworldly atmosphere. For those seeking a more adventurous experience, scuba diving allows you to explore the depths of the spring, uncovering hidden caves and underwater formations. Whether you’re a beginner or an experienced diver, the underwater world of Blue Springs State Park will leave you in awe.
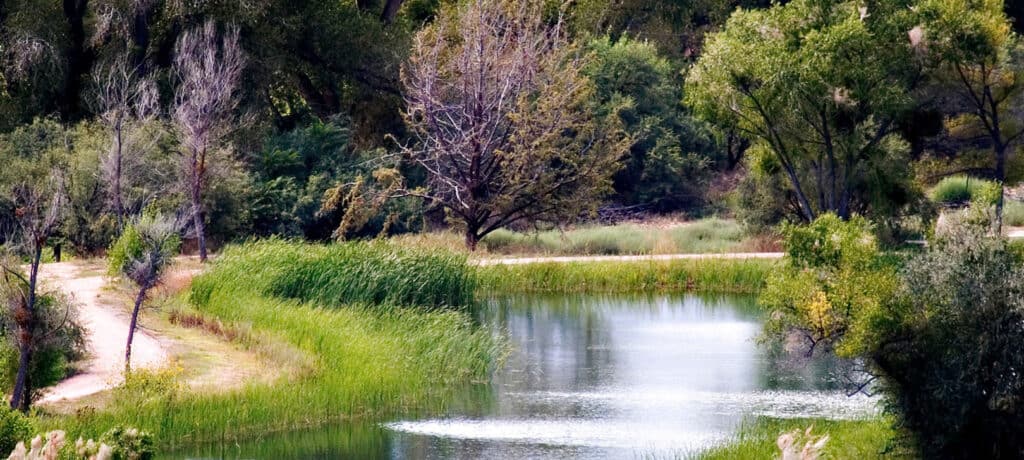
Aside from water activities, the park also boasts an extensive network of hiking trails, perfect for those who prefer to stay on land. The trails wind through lush forests, offering glimpses of Florida’s unique flora and fauna. Keep your eyes peeled for the elusive Florida black bear, which occasionally roams the park. River otters are also a common sight, playfully frolicking in the nearby waterways. Hiking through the park provides a tranquil and immersive experience, allowing you to connect with nature on a deeper level.
Wildlife and flora at Blue Springs State Park
Blue Springs State Park is home to a diverse range of wildlife and flora, making it an excellent destination for nature enthusiasts and photographers alike. The park is known for its population of West Indian manatees, which seek refuge in the warm waters of the Blue Spring during the winter months. These gentle giants can often be spotted lazily swimming or resting near the spring’s source, providing a unique and unforgettable wildlife encounter.
In addition to manatees, the park is teeming with other wildlife, including a variety of bird species. The tranquil setting of Blue Springs State Park attracts numerous birdwatchers, who come to spot and identify the park’s feathered inhabitants. Keep an eye out for ospreys, herons, and even the occasional bald eagle soaring through the skies above.
The lush vegetation of Blue Springs State Park adds to its natural beauty. The park is characterized by towering oak and cypress trees, their branches reaching towards the sky. Spanish moss gracefully hangs from the branches, adding an almost ethereal quality to the landscape. As you explore the park’s trails, you’ll come across an array of native plants and wildflowers, each contributing to the park’s vibrant ecosystem.
Camping and accommodations at Blue Springs State Park
For those looking to immerse themselves fully in the natural beauty of Blue Springs State Park, camping is a popular option. The park offers a variety of camping options, including tent camping, RV camping, and even cabins for those seeking a more comfortable stay. The campground is well-maintained and provides essential amenities such as restrooms, showers, and picnic areas. Waking up to the sounds of nature and the fresh scent of the forest is an experience like no other.
If camping is not your preferred choice, there are also nearby accommodations available. Several hotels and vacation rentals can be found in the surrounding areas, providing a comfortable base for your exploration of the park and its surroundings. No matter your preference, spending a night near Blue Springs State Park allows you to fully appreciate the tranquility and beauty of the natural surroundings.
The best time to visit Blue Springs State Park
Blue Springs State Park is a year-round destination, each season offering its own unique charm. However, the best time to visit depends on your interests and what you hope to experience during your visit.
If your main goal is to witness the manatees in their natural habitat, the winter months from November to March are the ideal time to visit. During this time, the manatees seek refuge in the warm waters of the Blue Spring, providing a truly magical experience. Be sure to arrive early in the morning to secure a spot, as the park can get crowded during peak manatee season.
For those interested in swimming, snorkeling, and other water activities, the summer months offer warmer temperatures and ample opportunities to cool off in the refreshing spring waters. The park is generally less crowded during this time, allowing for a more peaceful and relaxed experience. Keep in mind that the water temperature remains constant at 72 degrees Fahrenheit year-round, so even in the summer, the spring provides a refreshing escape from the Florida heat.
If you prefer mild weather and fewer crowds, consider visiting Blue Springs State Park during the spring or fall. These shoulder seasons offer pleasant temperatures and the opportunity to witness nature’s transition from one season to the next. The park’s lush foliage and blooming wildflowers create a picturesque backdrop for your outdoor adventures.
Safety tips for exploring Blue Springs State Park
While Blue Springs State Park is a stunning natural paradise, it’s important to prioritize safety during your visit. Here are some essential safety tips to keep in mind:
- Stay on designated trails: The park’s trails are there to protect both you and the environment. Straying off the trails can disturb wildlife habitats and increase the risk of encounters with venomous snakes or other potentially dangerous wildlife.
- Be aware of wildlife: While encounters with wildlife can be exciting, it’s crucial to maintain a safe distance and never approach or feed wild animals. Respect their space and observe them from a distance, using binoculars or a zoom lens for a closer look.
- Wear appropriate attire and footwear: Dress for the weather and wear comfortable, sturdy footwear for hiking or exploring. Consider bringing bug spray and sunscreen to protect yourself from the elements.
- Stay hydrated: Florida’s heat and humidity can be intense, so be sure to bring plenty of water and stay hydrated throughout your visit.
- Follow park rules and regulations: Familiarize yourself with the park’s rules and regulations to ensure a safe and enjoyable experience for everyone. This includes adhering to swimming and snorkeling guidelines and properly disposing of trash.
By following these safety tips, you can fully enjoy the wonders of Blue Springs State Park while prioritizing your well-being and the conservation of this natural gem.
Nearby attractions and day trip options
If you’re looking to extend your adventure beyond Blue Springs State Park, there are several nearby attractions and day trip options to consider. Just a short drive away is the charming town of DeLand, known for its historic downtown district and vibrant arts scene. Explore the unique shops, art galleries, and restaurants that line the streets, or take a leisurely stroll along the St. Johns River.
For those interested in history and culture, a visit to Stetson University is a must. This private university, founded in 1883, is one of Florida’s oldest institutions of higher learning. Take a self-guided tour of the campus and marvel at the beautiful architecture and pristine grounds.
If you’re craving more natural beauty, a visit to Wekiwa Springs State Park is highly recommended. Located just a short drive from Blue Springs State Park, Wekiwa Springs offers similar attractions, including crystal-clear springs, hiking trails, and opportunities for wildlife viewing. Canoeing or kayaking along the Wekiva River is a popular activity, allowing you to soak in the serene surroundings.
How to get to Blue Springs State Park
Blue Springs State Park is conveniently located in Volusia County, Florida, making it easily accessible by car. If you’re coming from Orlando, take Interstate 4 East towards Daytona Beach. Take exit 114 onto FL-472 West, then turn right onto FL-15A North. Continue on FL-15A North for approximately 5 miles, and you’ll reach the entrance to Blue Springs State Park.
If you prefer public transportation, several shuttle services offer transportation from Orlando to Blue Springs State Park. These services provide a convenient and hassle-free way to reach the park, allowing you to sit back and relax while someone else takes care of the driving.
Planning your visit to Blue Springs State Park
Before embarking on your adventure to Blue Springs State Park, it’s important to plan your visit accordingly. Here are some key points to consider:
- Check park hours: Blue Springs State Park is open year-round, but hours may vary depending on the season. Be sure to check the park’s website or call ahead to confirm the operating hours during your planned visit.
- Make reservations: If you plan to camp overnight or stay in one of the park’s cabins, it’s recommended to make reservations in advance. This ensures that you have a guaranteed spot and allows you to plan your itinerary accordingly.
- Pack essentials: Depending on the activities you plan to engage in, pack accordingly. Essentials may include swimwear, snorkeling gear, hiking shoes, sunscreen, insect repellent, and plenty of water.
- Bring a camera: Blue Springs State Park offers countless photo opportunities, so be sure to bring a camera or smartphone to capture the beauty of your surroundings. Consider bringing a waterproof camera or a protective case to capture underwater moments.
- Respect the environment: As with any natural area, it’s crucial to leave no trace and respect the environment. Dispose of trash properly, refrain from picking or damaging plants, and adhere to park rules and regulations.
By planning ahead and preparing accordingly, you can make the most of your visit to Blue Springs State Park and create memories that will last a lifetime.
Conclusion: Experience the beauty of Blue Springs State Park
Blue Springs State Park is a hidden gem nestled in the heart of Florida, offering a remarkable experience for outdoor enthusiasts and nature lovers alike. Whether you choose to explore the underwater world of the Blue Spring, hike through the lush forest trails, or simply relax and soak in the tranquility of the surroundings, this park has something for everyone.
Immerse yourself in the ethereal beauty of Blue Springs State Park, where crystal-clear waters and abundant wildlife await your discovery. Witness the magic of the natural world, as vibrant fish dart through the water and native flora thrives in the park’s lush landscape. Whether you’re camping under the stars or staying in nearby accommodations, Blue Springs State Park provides the perfect escape from the ordinary.
So, pack your bags, grab your snorkel, and embark on an adventure to Blue Springs State Park. Unveil the hidden beauty of this natural paradise and create memories that will last a lifetime. Blue Springs State Park beckons, ready to captivate and inspire those who dare to explore.